Friday, December 11, 2015

DIY Christmas Gifts

 $3 DIY Christmas Gift Mug


DIY Gift mug
Still trying to figure out what to give your child's teacher, a co-worker or neighbor for Christmas? These inexpensive gift mugs are perfect! My son started preschool this year, and I wanted him to be able to give his teacher and other staff members nice gifts that don't look cheap. This is what I came up with!

DIY Gift Mugs

What you'll need

1. Mugs 
2. Cellophane
3. Hot cocoa, coffee, cappuccino or tea
4. Assorted chocolate candy
5. Curling ribbon
Add caption
Curling ribbon

I purchased these mugs from the Dollar Tree. Initially I was going to get solid red mugs, but when I walked into the store these cute Christmas mugs were staring me in the face and they were just too cute to pass up. The cellophane also came from the Dollar Tree.

You can buy individual hot cocoa mix from almost any grocery store, and the candy came from Target. I recommend getting nice chocolate like Godiva, Ghirardelli, or Lindor Truffles. You can add a lot of candy, or just a little bit. Completely up to you!

Once everything is in the mug, wrap the cellophane around it then tie it with curling ribbon. 

And voilĂ !!!! A beautiful gift mug that takes under five minutes to make.
Gift mug
Final product - gift mugs
Make sure you pack them well so they don't break before getting to your destination.
Packed gift mugs

Check out my tutorial for these mugs on YouTube here! Subscribe to my channel for more tips!!!


Thursday, December 10, 2015

Blue's Clues Birthday Party

Blue's Clues Birthday Party


My oldest son Ethan discovered Blue's Clues one day while watching Nick jr. He absolutely loves Blue's Clues! Since it doesn't air during the day, we set our DVR to record the episodes at 3AM. Sure it's a show from the 90's and my youngest two siblings (who are now in their twenties) loved it when they were kids, but it's still an awesome learning show!

So for his 4th birthday, I had to do a Blue's Clues theme! I had to be a little creative since you can't find a whole lot of Blue's Clues themed party decorations. We played pin the clue on blue, and we even looked for Blue's Clues with our Handy Dandy notebooks!

Check out how I pulled off this fun theme!


Blue's Clues Party

Blue's Clues Paw Print Cake

This cake came from a local grocery store. I requested a 1/4 sheet cake with light blue icing and royal blue paw prints all around the cake. No top border and alternating blue dots for the bottom border. I couldn't be happier with the outcome. I also ordered cupcakes with two different blue colors.

Blue's Clues paw print cake

Birthday Banner

I made this banner through Vistaprint. I found a picture through a google search and uploaded it, I added the message through the editing on Vistaprint.
Blue's Clues birthday banner

Party Decorations


Blue's Clue's centerpiece and 

The centerpiece came from Amazon, you can buy it here for under $10. The blowouts also came from Amazon, buy them here. The garland came from target and was $3.99 check it out here.


Mr. Salt and Mrs. Pepper party favors

I have a very talented niece that can make anything! She's always my go-to person for anything arts and crafts. My sister found these tiny salt and pepper shakers at Dollar Tree and thought it would be a great idea for her to paint them and this is how it turned out! They look just like the Blue's Clues characters and you can add jellybeans or any candy of your choice.

Mr. Salt & Mrs. Pepper party favors

Mr. Salt & Mrs. Pepper

Favor Bags

These bags and paw print stickers came from Amazon. The card was printed out and edited by me on my computer. The kids loved these favor bags!


DIY Handy Dandy Notebooks

I scoured the internet to find handy dandy notebooks that weren't $15 a piece. Everything I found was too expensive so I decided to try my take at making them. I found a picture of the "thinking chair" here, and printed it out on white card stock. I found these notepads at the Dollar Tree in their school supplies section, they worked out well because the have red wire at the top just like the real handy dandy notebook. I cut out green construction paper and glued the pictures of the thinking chair onto the notebook, then glued that onto the notebooks and voilĂ  - Handy Dandy Notebooks!!!
Handy Dandy Notebooks


We really enjoyed our Blue's Clues party, hope you enjoy yours as well!


Wednesday, November 18, 2015

Transform your pantry with five easy tips!

I don't have a huge pantry, so I'm always looking for ways to utilize every space and make it look pretty. Here are my five tips to easily transform your pantry. 
Click here to check out my video on how to organize your pantry!

Before


Tip 1

Line your shelves

Adding a shelf liner can completely change the look of your pantry. If you have wire shelving it is a great idea to line your shelves so things can move easily and nothing will fall through. You can buy a shelf liner at many places like The Container Store or Target. This particular shelf liner is from Walmart and was $5.48. It's not a self-adhesive liner so you can easily reposition or remove it. You can buy it here.

Tip 2

Maximize underutilized space

When you have a small space, it's important to use every piece of that space. A good way to achieve this is by adding shelves to your pantry door. These spice racks are from Ikea. Check out this video to learn how to assemble and install the spice rack. 


Adding command hooks to the wall is a great mess free way to hang aprons.


This modular flip-out bin from The Container Store makes storing tea simple and easy.


Tip 3

Use containers

Air tight containers are ideal, but if you're on a budget these Dollar Tree containers will work just fine. What I love about storing things in containers is how it gives your dried goods a uniform look and cuts down on the mess caused by leaving flour in a bag. Don't forget to make sure everything has a label!


Tip 4 

Utilize floor space

Use stackable bins to store paper products, fruits, veggies and snacks. You can buy these bins here.


Tip 5 

"A place for everything and everything in it's place"

Decide where you want everything to go. So when you move it, return it to its place. Every single item should have a home, otherwise it will be much harder to keep your pantry looking great.


Wednesday, August 5, 2015

Mickey Mouse Birthday Party

Mickey Mouse 1st Birthday Party


We recently celebrated my youngest son Gavin's first birthday! He absolutely loves Mickey Mouse, so I had fun putting together his Mickey Mouse 1st Birthday party.


These are pictures from his party. I've also added links to where you can purchase the items and how-to's for the DIY items.

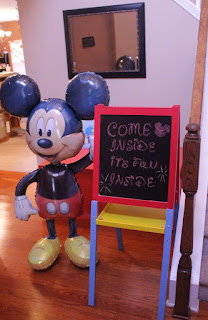
Mickey was at the front door to greet everyone!


I purchased this mickey balloon from Amazon, and was able to get it filled with helium at Party City for $8.99. My 3-year-old son and 2-year-old nephew had so much fun playing with this balloon. They were so rough with poor mickey that by the end of the night his head was floating on my ceiling.

My niece wrote the message in disney writing on an easel we already owned.


Mickey Mouse oreo cookies


These cookies were very simple and easy to make.

What you'll need:
1 box oreos
1 bag Wilton red candy melts
1 bag Wilton black candy melts
White frosting, cookie icing or piping gel

1. Follow the directions on bag to melt red candy
2. Dip oreos halfway in melted candy, let cool on parchment paper
3. Once candy has hardened, insert 2 black candy melts into each oreo, making mickey ears.
4. Put white frosting in piping bag, and pipe the
white dots onto each oreo to make Mickey's buttons.


These bags were purchased from Amazon for $1.49 for 12. We used poster board to make the buttons, and secured them to the bags with double stick tape.

I considered buying Mickey Mouse ears from Etsy, but they were way too expensive so I decided to do it myself. The total cost to make 12 sets of mickey ears was less than $10. I bought 8 sheets of felt from Michaels for $.30 each, totalling $2.40. The headbands were $3.99 for a pack of 12 with $3.00 shipping. Here is a quick and easy video tutorial on how to make the ears. You can download the template for the ears here.

My sister and I decided to make Minnie Mouse ears at the last minute since we were both wearing red. I already had red and white polkadot napkins for the party, so we created bows from the napkins and they came out looking pretty cute. We attached the bows to the headband with tape.


These balloons added a nice touch to the party. I purchased them from Amazon in red, yellow, and black.


This high chair sign is so adorable and I downloaded it for free. You can download the templates here.


Kids and adults enjoyed playing pin the nose on Mickey! You can purchase it here.


These straws can be purchased at any party store, mine came from Amazon. Here is where you can buy the red or yellow straws.


Making this Mickey Mouse inspired table cloth was simple. Checkout the instructions below.


What you'll need:
1 black table cloth
1 red table cloth
Poster board/card stock or any stiff white paper
Tape
1. Let the red table cloth drape down the front of table. Use tape to secure the top of table cloth to the table.
2. Fold black table cloth in half length wise, lay it on top of the table.
3. Cut two oval shapes out of the poster board and tape to the front of red table cloth.
*Note- if you don't plan to push the table against a wall, use 2 red table cloths so it will be draped on both sides.


The cake came from Publix super market. I ordered a cake in the shape of the number one and asked them to cover it with red and yellow polkadots of different sizes with a black border. I used left over wilton candy melts to create the Mickey Mouse shape on the cakes.


Of course, no Mickey party would be complete without a Hot Diggity Dog bar!
Mickey Mouse Hot Diggity Dog Bar

Hot Diggity Dog Bar
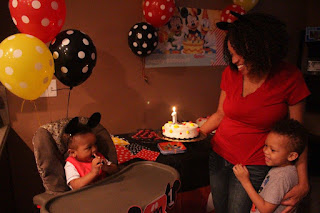
Here are pics from the final set-up and party pics. Hope you enjoy planning your party as much as I enjoyed planning mine!

Mickey Mouse Birthday Party


Awe... thanks for stopping by!!!